


Introduction
Peace to you all , Here is the Link to my previous blogs, Where I have posted about Docker, Containers and DevOps.
This is Day 6 of documenting my DevOps journey .
This blog focuses on Creating our own image using Dockerfile.
Getting Started
In the previous blog , We committed our changes to an existing Nginx image , stored it and then pushed it to DockerHub.
When things get complicated like installing dependencies etc., DockerFile comes to the scene.
Basic Dockerfile Structure
Every Dockerfile must have FROM command where the base OS is determined. A basic structure of Dockerfile for Nginx can be found in the same DockerHub Nginx page .
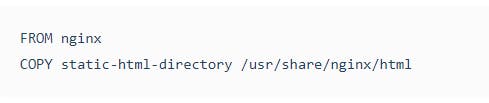
In our case ,
FROM nginx
COPY . /usr/share/nginx/html
The FROM command , tells what is the base OS for our container ,
The COPY command , copies the content from our host to the container . Here we have used ‘.’ to represent that we need the current folder to be passed to the container.
Building an image using our Dockerfile
We have to save the above mentioned in a file called Dockerfile and save it along with the index.html we already have.
Also , we have to ensure that it is not saved as txt or any other text formats.
In order to build an image with the Dockerfile , We can use the build command.
docker build -t dockerfileimage-nginx .
Breaking the above line,
build - this command is used for building an image ,
t - this is used for naming and tagging the image which is followed by it,
‘.’ - Dot is used to tell the docker to find the dockerfile in the same folder as we are in.
Docker Image
Once build finishes , try running the docker images command.

!!! We have successfully created an image using Dockerfile.
Running our own image
Running this image is same as normally running a docker image pulled from DockerHub.
docker run -p 80:80 -d dockerfileimage
Open localhost:80 and check once the container starts running .
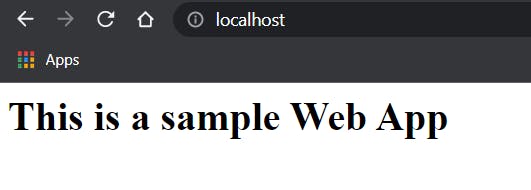
!!! We successfully ran our own image created through dockerfile.
Pushing the image to DockerHub and pulling the same from DockerHub is same and we have learnt in the last blog .
What have we done
First we took the base image for the project to run ,
Then we copied what we want to copy in the respective nginx image container directory.
Using these two commands we built an image and also ran it .
See you Tomorrow
Okay . So hold on, stay with me as we get to know docker more and DevOps even more.
Okay Then , Will get back Tomorrow with more!
Peace be upon you!